
How To Play a C Chord & Major Scale | CAGED System
If you’ve ever wondered how to play a C chord and how the C chord is made, you’re in luck. Today we will be reviewing the music theory behind the C major chord. Additionally, I am going to walk you through each location of the chord on the guitar neck using the CAGED system. The CAGED system is a great way to change the sound of your standard chords and add some flavor to your rhythm and lead guitar playing. If you combine the CAGED system with a little music theory, and you will be taking steps towards becoming a monster guitar player.
Be sure to watch our YouTube lesson which covers everything that’s included in the lesson that follows! And as a bonus, at the end of this lesson, I’ll provide a link to all of the scales that are included in the lesson below.
C Major Chord – Theory
Any major chord you play is made up of the 1st, 3rd, and 5th note of the chord’s major scale. Every chord will have a corresponding scale, and in today’s case, our C major chord is built from the C major scale. In the C major scale, the 1st note is the root note of the scale, and the root note for the C major scale is, you guessed it! C!
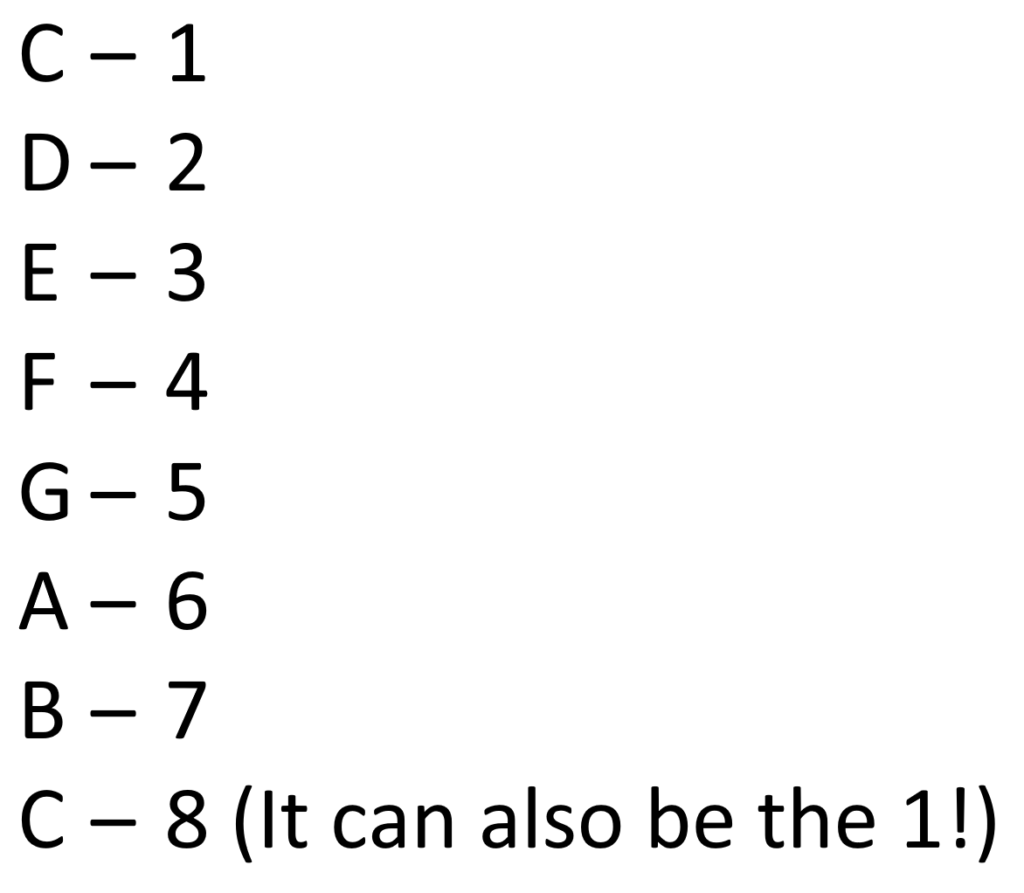
Finding the 3rd & 5th is pretty easy. All you need to do is assign a number sequentially to each note of the scale in ascending order. For example, the first note of the C major scale we already know is the C. The second note of the scale would be the next step up or a D note. The third is the E. Fourth is an F. Fifth is a G. Sixth is an A. Seventh is a B. And the Eighth, or the octave, is the C again. If it helps, check out the diagram to see the notes of the C major scale, and their corresponding numbers.
If you’ve seen the major scale referred to as the Ionian scale, please do not be confused or alarmed. The Ionian scale is just another way of saying the major scale. Major & Ionian are one and the same.
CAGED System
There’s a lot of information out there on the CAGED systems, and the CAGED system it’s one of my favorites. For a beginner who knows their cowboy chords, the CAGED system is a way to use the chords you already know and apply them all over the fretboard. An intermediate player should be able to learn quickly from this system too!
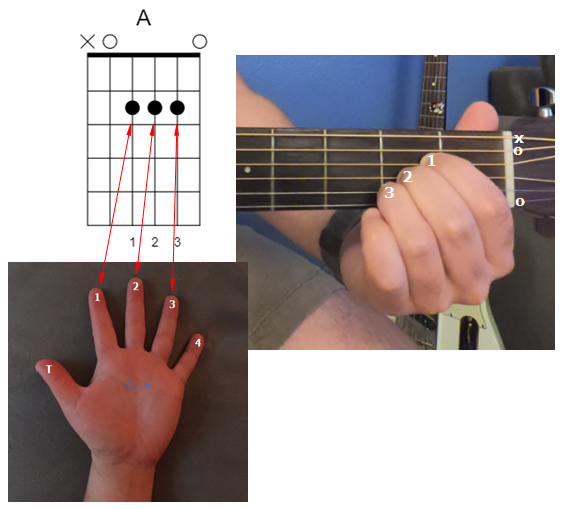
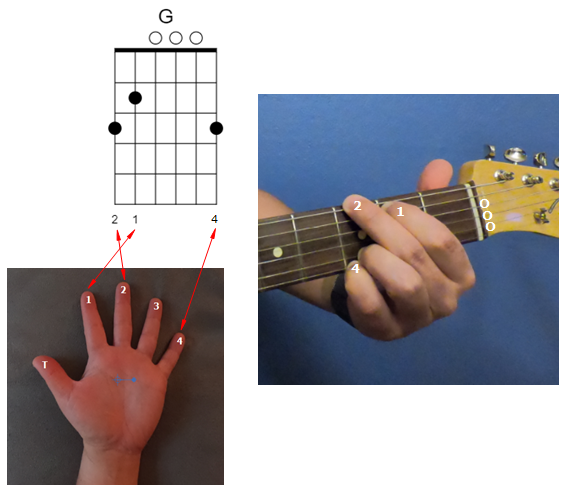
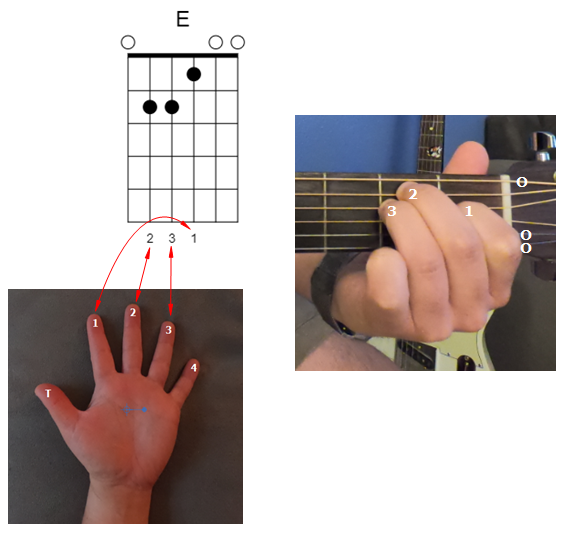
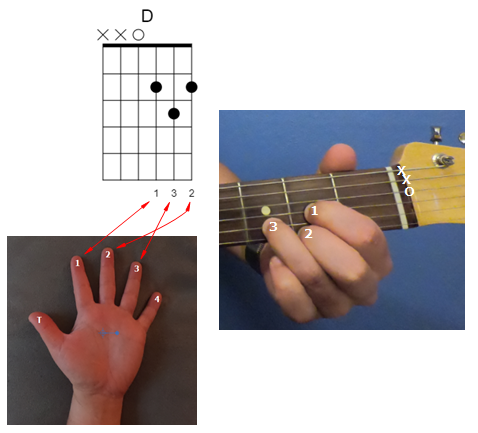
So what is the CAGED system? Basically, the letters that spell CAGED represent the major chord names you know on your guitar. We’re talking about your C chord, A chord, G chord, E chord, and D chord. If you don’t know these chords, you’re going to need to learn them before you begin applying the CAGED system. If you need a refresher, check out the chord diagrams below for these five chords. Practice and memorize these chords.
If you need help reading the chord diagrams, check out our full post on how to read guitar chord diagrams here: https://smellytele.com/how-to-read-guitar-chord-diagrams/.
Turn These Chords Into Bar Chords
The basic idea of the CAGED system is you take these open chord shapes, turn them into bar chords. Then, learn how to play them in each location on the guitar’s fretboard! This forces you to recognize that the chord shapes do not change on your guitar, and depending on where your hand is on the fretboard, you can always find a chord using these shapes. The better you know the chord shapes and the fretboard, the easier it will be for you to play chords everywhere.
But I always found that learning how to play chords sequentially up the guitar neck to be boring and way too academic. It’s not fun to play an E chord, then play the F bar chord, then the F# bar chord all while memorizing the name of the root notes as you go. BLEH!
I’m going to take a different approach and teach you how to use the CAGED system for one chord. That way, you can use what you learn today immediately in your playing. As you review more of these CAGED system lessons with different chords, your knowledge will steadily increase. You’ll build on each lesson and get better and better as you learn more and more chord positions.
C Shape – C Chord
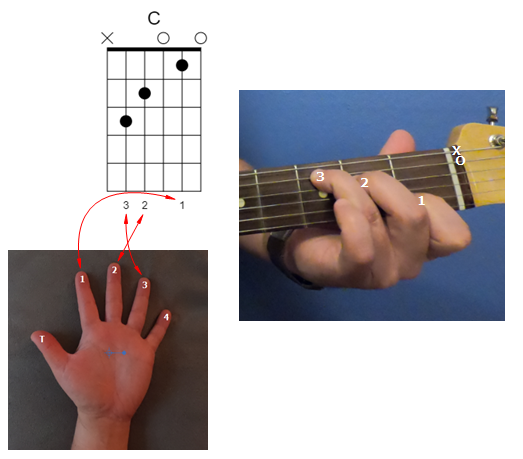
Now it’s time for you to review the first C chord shape which simply is the open chord. Check out the chord diagram below. This is your typical cowboy chord fingering and should be very familiar to you.

Be sure you review the scale that corresponds with the open C major chord. The scale below highlights the root note, or the C notes, in blue. It also highlights the 3rd & 5th notes of the scale in pink. If you remember from the music theory portion of this lesson, the 3rd and 5th notes combined with the 1st note, are the building blocks for the C major chord!
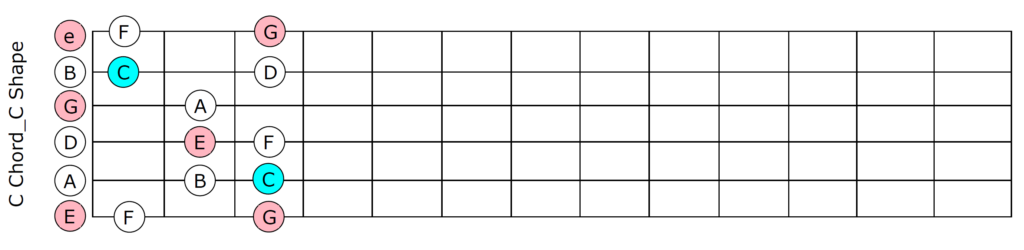
Feel free to practice these scales! I encourage you to remember where the root notes are. Start and end each scale on these root notes. These are the most important for right now.
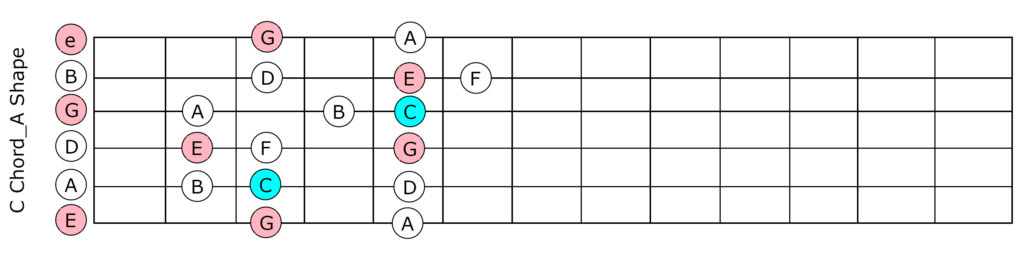
A Shape – C Chord
Next, you use the A shape from your A chord, and slide it up to the 3rd fret of the guitar. The 3rd fret of the A string is a C note. If you bar the 3rd fret of your guitar and combine the A shape with this bar, you will get a C chord.
Note that the A shape is on the 5th fret of the guitar. This wil be important when you learn how to play a C chord using the G shape.

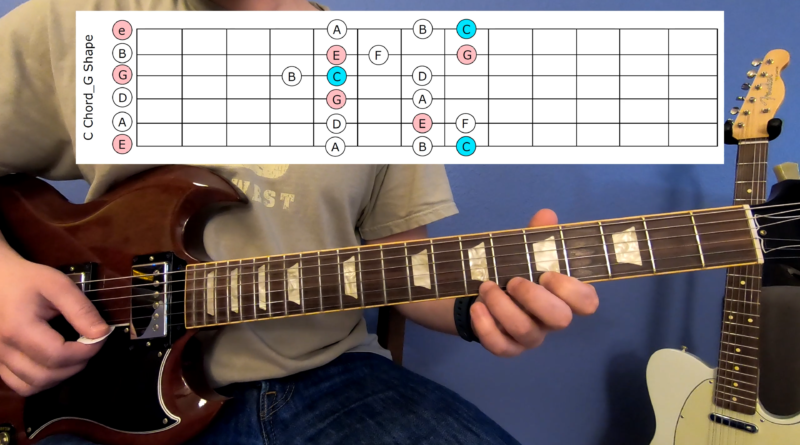
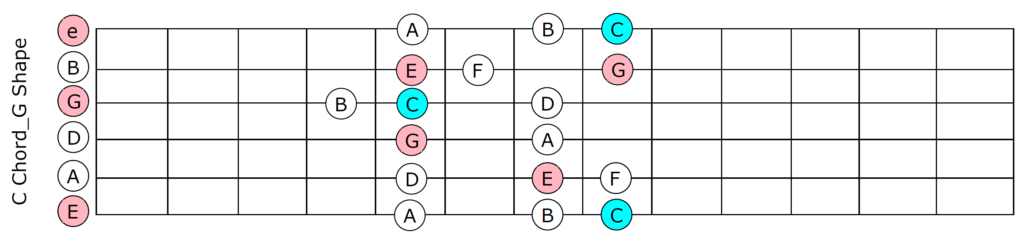
G Shape – C Chord
Now we’re going to do the same thing with a G shape. The 8th note of the low E string is also a C note. If you move the root note of your G chord (3rd fret of the low E string) to the 8th fret of the low E string, you will be ready to play your G shape. Note, this is a BIG stretch for your fingers, so if the entire G shape is too much for you, you can always play a triad. The triad is a any combination of the 1st, 3rd, or 5th notes (C, E, and G).
Notice how the A shape on the 5th is now you bar for the G shape! Pretty cool! If you learn both the scales in the A shape and the G shape, you can remember that the two scales and chords are connected at the 5th fret!

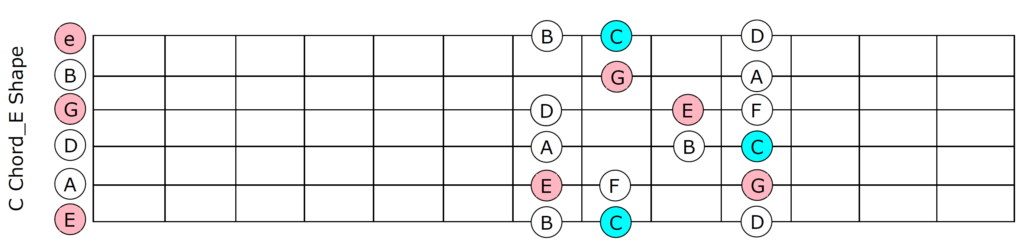
E Shape – C Chord
The E shape is basic, and learning how to play a C Chord should be easy. We are going to still use the 8th fret of the E string (C note) like we did with the G shape. This time, we will bar the 8th fret of the guitar and add an E shape over the bar. Now you’ve got a C chord at the 8th fret.
Notice again how the G shape and the E shape connect with each other at the 8th frets of the low and high E strings.

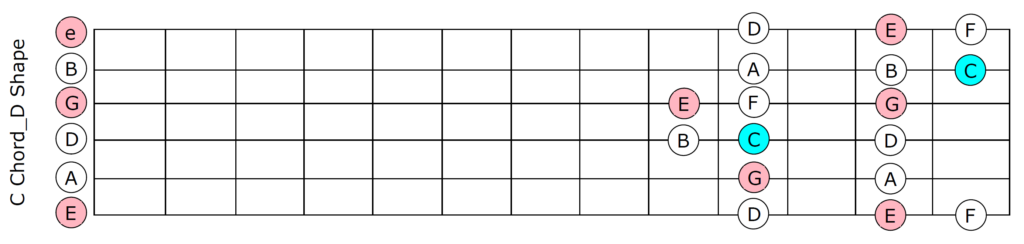
D Shape – C Chord
Finally the D shape will be used. We need to change the root note of our D shape chord to a C note, and we do this by fretting the D string at the 10th fret. Theoretically, you would bar the 10th fret here, however, the other notes of the D shape can be played without needing to bar the fret.
The C chord shape and the D chord shape are very similar to each other. You’ll notice that the C chord played here at the 10th fret shows you fretting the 12th fret of the G string, the 13th fret of the B string, and the 12th fret of the e string. Theses notes are the octaves of the lower half of your open C chord. So, you could play the 15th fret of your A string and the 14th fret of your D string and create an octave C chord using your C shape!

BONUS!! How To Make A Chord Anywhere On Your Fretboard!
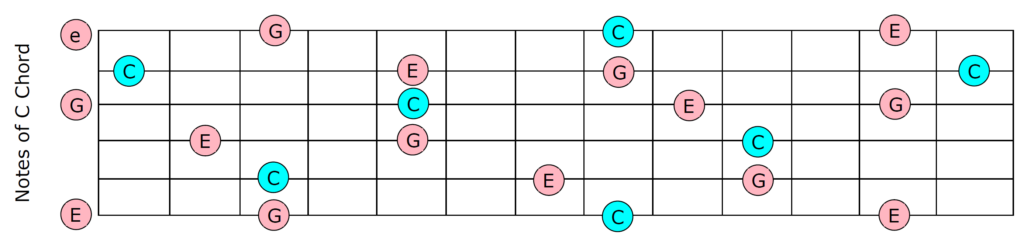
You’ve seen all of the scale positions while learning how to play a C Chord, and each diagram shows you the root note (C), the third (E), and the 5th (G). If you remember that any combination of the 1st, 3rd, and 5th notes make a major C Chord, then you can combine any of the blue and pink highlighted notes to make a C chord where ever you want. The only limitation is how far you can stretch your fingers to reach these notes!
Check out the scale diagram below. I’ve removed all of the 2nd, 4th, 6th, and 7th notes from the diagram, and I’ve left ALL of the 1st, 3rd, and 5th notes for you. Any combination of these is a C chord, and these are the building blocks for how to play a C Chord anywhere on your guitar! If you’d like to print these scale charts and study them, you can purchase and download the sheets by clicking here!
That’s It!
Now you know how to use the CAGED system to play a C Chord any where on the guitar neck! It’s a great tool, and you should be excited about expanding your guitar knowledge! Give yourself a pat on the back!
Like what you’re reading? Enter your email below and click Sign Up to subscribe to our email list. You’ll get the latest updates from The Smelly Tele the moment they’re published. We will never send you spam.
If this lesson was too advanced for you, please send me an email! I’d love to hear what you are struggling with, and I’d be happy to help you! Other players like you struggled with the same thing, so don’t be afraid to ask!